Thursday 11 November 2010

"Not Growing Up" from the kitche

In this post Ill try to show how did I managed to do some thing in the animation. I find most of this stuff funny and dont get me wrong quite clever as well.

Picture from the set. Panayiotis (art Director and second Photographer) and me checking the composition of the shoot.

This is the middle of the summer in my room. The light is firmly blocked with the use of cheep paper and sleeping mats... usually they did the trick.


The shoot where the apple fly in the air and falls back down... How did you do that, people ask... Nothing easier, you take a needle and tape it to the ceiling, take a thread with is the same colour of the background and simply pull the string.
If that did not work (because the apple pulled up on a string doesn't twist) you do it digitally... and that's what I did.

This is a shoot of the whole set. So if you thought that the animations is made by a professional... you could not be more wrong.
The background is made with the use of window blind pinned to the wall. The 2 set is build with two planks of wood taped to my drawers and cause of that I did not have access to my fresh socks for ... for some time.

Oh yea, and if there is light changing in my movie, that's because of my Lithuanian friend Tomas (catering Master in the project).
Tomas tend to woke up drunk during the shoots. Stud up walk around the room in his white T-shirt changing completely the light in the room. Yeap thats the people I have to work with. But to be fair to Tomas I need to say that thanks to him the movie looks the way it looks... and I have much more post edit work to do...
Tuesday 9 November 2010

Bunny Rabit Face

I had a very strong idea on how I want the face of the Rabbit boy to look like. I had it in my head, but I find it difficult to put images from my imagination on paper. Just not enough practice, I usually draw from observation. I decided then to ask an illustrator to give it a go and although it helped it wasn't a simple proses. Mainly to communicate ideas piece. In the process of communicating there is always some information lost. And the gaps of information are filled in by a creative person with there own interpenetration.... with is great and bad at the same time. This proses gave ma something to think about, but I haven't been quite there yet.
A friend gave me a name of a nice illustrator... but I forgot his name just now... anyhow this guy inspired me a bit. He is making loads of illustration with kids having enormous heads and big eyes. Caricature. And that was exactly what I needed to see. It allowed me to clarify my design.
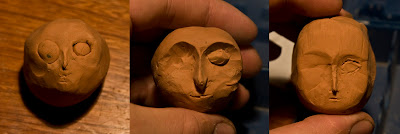
Next step was to make a model ... and this bit of work was very frustrating. Switching from working in 2d into 3d portrait was a bit painful... well, took me one evening.


Now to take out the real stuff. A plasticine kind of stuff that dries out in few minutes, and gets solid hard (and light) over nigh. When you take it out of the pack, its nice and  white. But its very easy to make it full of dust, so its important to keep tidy while working with it. I found that the best way of working with it is by using wooden modelling knife and spit. Just like with clay sculpturing, until you work you keep the surface wet.
First, I made two balls. I tried to make them kind of the same size and as round as possible. After they dried I put some nail polish on them, to make them solid and durable but most of all I wanted them to shine.
My objectives:
- Hide all the metal elements.
- Place the head in the right palace on the spine.
- Make the Head the right size comparing to the rest of the body.
- Fit in  the two balls that I have previously made. They needed to be spot on in the right place or the whole face would look wrong.
- Sculpt the face.


Well, Ill say that it looks nice. But lets wait for the final result when I finish the shoes and the paint work.

Wednesday 4 August 2010

Bunny Rabit #2


I have this flat mate. She is a 50 year old Polish housewife. I thought she knows all about sewing... but nooooo. Just my luck, she turn out to be the cooking/cleaning housewife and not the sewing one.
The material that I used was from a jumper from a second hand shop... paid £2. When I tried to get some similar textiles from a shop I was asked to pay £10 for few bits.


So there's me taking my chances against the devil machine... The two first attempts were far off from satisfying. And the third one, what could I say... it went perfectly, no problems what so ever. No mistakes, no screw ups, exactly what I wanted. Nice.

Bunny Rabbit

Well, I'm not sure which day is it today. I decided to loose track when I didn't do anything through the weekend. Anyhow I'm still working and have loads of new stuff I need to publish.

Armature.
I looked all around Dundee for bolts and nuts and I managed to find nothing. The best and only place as far as I concerned is the internet. I placed my order on The Site Box website. It took them a week to get the stuff to me and a £5 for delivery but still at least now I have all the stuff that I need for making the armature.
This armature is smaller and more complicated than the one I made for the A.R.T project. But thanks to the previous project I know the weak points of an armature of this type. I managed to re-enforce the weak points and stop the bolts unscrewing. The puppet moves and reacts much more precise and fluently than the robot from A.R.T. project. I'm very happy with that, and cant wait to start animating.

Thursday 22 July 2010

Building The Hill

Day 4


Hill = Clay + Chicken Wire + My X-girlfriend's XX-boyfriend's quilt cover.
Tree = Chicken Wire + Scrap Metal + Wire + Plastic Bag

I built the set about three month ago and started a different project after that, so I haven't touched the hill  since. Frankly I had a small problem to get back working on it, but luckily my flat mate came round and helped me to "open the paint". I have to say that it was fun to paint the set. I took out my acrylic paint and just went mental on in. It all went very messy but smooth. My target was to make the set vibrant and three dimensional and not flat with pure light green. I'm happy with what I ended up with. There is a lot of randomness and dirt that in my opinion looks like a real hill. Nice.

Sewing Machine

Day 3
I got the sewing machine to work!!!
I need the machine to sew the rabbit costume. And it could sound easy for some, but the first time I tried to do something with the machine I ended up breaking it. So I have been kind of avoiding the problem for some time now, but its about time to face the mechanical creature.
A grown up lad is spending the evening playing with a sewing machine... that's just not right... I took some parts out, loosen some bolts and added some oil here and there, and got the machine to work, but still it did not sew properly. It takes TWO grow up lads to figure out how it's suppose to be done... Thread here and then there. Bobbin in here and like that... nee bother... How many guys these days know how to use a sewing machine... that right... only gay fashion students and me. Quality.

Rest of the evening spent on sculpturing the boys face... not happy with what I've end up with though.

Rabbit Puppet Armature.

Day 2
Long day at work, long and not very enjoyable evening on Sepulturas concert, but luckily I managed to do some work just before I left for the gig.
Rabbit armature for the "Not Growing Up" project will be made with screws, that are suppose to work as joints. Its a technique that I have already tried out in the "A.R.T." Project. Was it successful... I wouldn't say that. There were cons and pros. Screw armature gave me a very stiff robot that moved in the joints but nowhere elsewhere. The plasticine puppets move all ways and every direction... which is not always good. The screw armature tends to loosen up and requires tightening and the puppet always loses balance... but that last one could be cause of a bad puppet design.


The Rabbit armature is a new design and has, I hope, better solutions for joints placement. The arm should be capable of moving more precisely, than in the previous armatures, as it's placed in a different dimension. I'll use spring washers to get less traction in the joints, I hope that that will make the armature movement more fluent... Well I just can't be bothered explaining what I did with it, its all on the drawing.

Monday 19 July 2010

"Not Growing Up" Animatex


I did the Animatex some time ago to submit for university. Since then the script changed several times and now it looks quite different but nevertheless watching this animation was very helpful in script writing process.

Not Growing Up Project Starts

Its this time of the year again. Middle of the summer, girlfriend away to London and its raining in Scotland... perfect time to make a animation. I'm starting my next best production. Its called "Not Growing Up" and its a short clip for my friend's music. The story's about a boy who does not know that what he's trying to do is impossible and even more than that its silly and pointless. He is being naive and childish but that is why he succeeds.  He is pure and innocent. The story could be understand on several different levels. It about friendship, sacrifice, nature and if you're weird you could think that the film's about YOU... and vegetarians.


DAY 1
Finishing the script. I have been working on this script for the last few months. I modified it loads of times but could not get it quite right. Sometimes the story did not go well with the sound, sometimes it was expanding into pointless directions, and most of the time I did not like what I was getting. But day 1 was very successful as I finally made up my mind on what the story going to be like. Lets just see if its flawless and I won't have to change in the middle of the animation making process.
It looks like I have discovered my way of script writing. It is much quicker, and the script I end up with is something that I can really rely on. Sounds silly, but it makes sense to me.

Monday 10 May 2010

A.R.T.... first release

Well shake my legs and call me grandpa, I did it!


The first release, Ill give it a month and then Ill re-edit it as there's still quite a few glimps. Im glad that my sound producer committed to keep working on it with me. To set thing straight I think that there are still few things missing sound wise.

Tuesday 4 May 2010

Rough Cut.

There is the full Animation, a rough cut.
I am aware that it is terrible, but nevertheless I LOVE IT, I can see the potential in it, and to prove my point to everybody that reads my blog (my girlfriend) I will make this animation count and it will get me my future dream job... driving licence and a long beard.. NICE.

Re - Edit


It is fascinating what a difference editing makes.
When I edit the video for the first time it looks shocking. It did not make any sense what so ever. And I think that I am the only one that know what was going on in the peace.
But after I work on it for a little bit, extend the pauses, live the shot hanging there just for a bit longer makes a great difference.
Last summer I was working on a film set, and one girl told me that EDITING is a second stage of directing, and Ill have to say that there is a lot to it.


The only problem that I have is that my computer is capable to write Word documents and maybe browsing the web, and not much more than that. When it goes for rendering animation all you can do is click and relax in your hair, cause the computer will take its time to operate your one click. Not to mention the time that my computer take to render the whole peace... I just set it to work during the night... did I mentioned that the whole peace is 5 minutes long... Shocking.

Wednesday 21 April 2010

NOISE

Just discovered that in some places I should have made pictures on a much higher ISO, this way I would have got Noise which would have perfectly fit in in the whole concept of red lights that I am using for the day three of the animation. This way the aperture could stay quick, which would be helpful.

Pros of using Noise:
- Interesting look.
- Easier to take pictures.
- Easier to get a red mood.

Cons of using Noise:
- Less control over colours.
- Already made some pictures without the Noise.
- A bit cheesy look.


In this shot the Robot is getting mental and starts to stab the Sculpture...

Few shots made with high ISO.

Day Two/Tree

The artist is having a bad day at the studio, after yesterdays artistic failure he is trying to recover by changing the chisel to a one with a bigger calibre. In result he makes a big dreadful cut in the sculpture. The big scob is falling on the ground. In mid air the blue colour that characterise the day two changes to red which is the colour of the day three.
I have decided that this transition would be visually more interesting than sudden change of colours between shots.


This is a transition between day two and day three of the animation.


How have I done the shot... nothing to it, just a bit of tape red glass and blue foil that I never through out cause I thought I could come in handy.

Tuesday 20 April 2010

Day One


The plan was to hand in the animation to my sound producers on the first days of April. Just now its 20 of April and I just finished the second day of my animation. Al dough the film is not ready there is still a good reason to celebrate. I have done two days out of three. I have send the day one to the sound producer, and he reacted positively on what he seen. So not bad.
Do I like it? Not really but I have decided that Ill retake the shots that I don't like after the whole animation is recorded. I hope to find some time for it then. Just now I need to focus on staying consistent in the quality of recording. I feel I getting sloppy.

Thursday 15 April 2010

Glass Filters

As I have access to colour glass I have decided to use it as filters in my animation. I was expecting a lot of problems but it turns out quite well, well besides the fact that it takes a long time to set them up. I have read few books on setting lights, light temperatures and thanks to that I could nicely set the lights to, for example, the create a mood of bright morning using bits of distorting colours.

Problems:
- the glass tends to break because of the lamp temperature.
- the glass is heavy and although I cut it to the required size, it is still a problem to fit them to the desk lamps.
- takes a long time to set up.
- the glass colours. I have picked up some pieces of glass from a stain glass workshop where I work but the colours and textures you see looking through the glass are very different than the effects that you get when the same glass is used as a filters for lamps. I have ended up using just a hand full of colours as most of the glass was not hanging much.
- the filter changes the light strength. A filter is essentially blocking a given colour from the light source, making the light source weaker overall. And that means that for some shoots I needed to pull the light closer, so sometimes the camera movement was restricted only by the way the lights were placed, as they were standing just next to the objects.

Second Miniature


This is a second shoot for which I required to build a miniature set. And as always I though that Ill take me maximum a day, but as I started to build furniture the whole proses turn out to take over three days.


The most difficult bit was to build a miniature of a working light. I managed to get a hold of some LEDs, got some shits of metal, few wires... and after couple of hours I had this.

It was a bit faulty so every now and then I had to swear but that did help a lot.

Monday 5 April 2010

The Sculpture


So the idea for the animation is straight forward. An artist sacrifice him self for the sake of art. Precisely the robot makes a sculpture and ribs out bits of him self and stick them on to the sculpture. It is difficult to be more literal.
So there is the sculpture and he ads a bits of metal on to it... but wooooooow, slow your horses. What sculpture? I'm not a sculptor, although I do have chisels and some time ago I did attempt to sculpture but after I have browsed the web looking for inspiration I have found only contemporary evil and that put me off sculpturing so frankly I had no background for what's ahead of me.
So yea, possibly this is my apology for what I am just about to sculpt.

Smoking doesn't kill robots

I have decided to use a real smoke for this shot. The way to do this, is to set the exposure for a very short time. I decided to give it a go although I wasn't t sure if it worked.
Opened the window wide, taped the cigarette to the robots face, made a long paper straw and attached it to the cigarette. With this set up I was ready for the robot to smoke. Now only an hour of light adjusting, so that the smoke would be nicely highlighted. Rehearsal of the camera movement and focus changing. And all set, I was being very precious about preparing for this shot, as I have managed to get my hand on a cigarette, and that was only one cigarette.


So the outcome is not great, but I believe that I will manage to cut out a nice bit out of this.

Friday 2 April 2010

18 down 40 to go... complaining

The movie consist 68 shots. Approximately 68 shoots, as probably I will have to add a few in at the editing stage.

My problems until now:
- the floor in my room is moving and that is the thing that well annoys me and my flatmates who hear me walking and every time I make a step, but most of all the tripod moves when I'm shooting and that is very bad.
Solution... swearing in foreign language helps, but other than that I just need to check the previous shot when I moved.
- the glass that I am using as filters tend to heat up and break.
Solution... cry very loud.
- reflections. I tend to forget about the screen or any other small source of light. So all for sudden when I do some movement the reflections show that there is some light missing. That is well annoying as very often I haven't got any other way to aces the puppet because my room have obvious space limitations.
Solution... do it again or stick with it. In one shoot I could clearly see myself and I was suspecting that I could have problem with the reflection so I simply go back to the same pose all through making this shoot, and I think I will work out well as the shoot is reasonably short.
- budget limitations. I am making the whole animation with 3 desk lamps. So sometimes when I am making a shot with a soft diffused light I need to set up the camera to 3 second exposition. Essentially that means that sometime I need to hold my breath so that my hand holding the puppet in mid air would not shake. So who said that stop frame animation is not dangerous for you?
- lack of assistant. The other day I was making the shot of a hand lifting up the chisel. So that mean that with one hand I am holding the armature hand mid air, with other hand I am trying to animate the fingers closing on the chisel with by the way was not helping at all. With my feet I was releasing the shot.
Solution... Girlfriend, Friends, Flatmates.

Who you know

The other day I went to a presentation of Richard Heynes. Our tutor said that he works for Aardman and all that, so there was a good reason why I should not like him. Anyway I have approached him so maybe he will read this blog, so yea he is a great guy, he is my favourite and I love his chin.
Richard is working in the industry for 7 years now, took part in illustrating the book that I am interested in buying and now he will work in a feature project with Aardman, so essentially he is in the place that I would like to be at.

Richard says:
- its all about how and who you approach.
- in my folio I should include simple exercise like walking cycle and picking up things and not necessary a whole movie, because they will not look at the quality of shots or composition or colours... So that got me thinking that the animator position is not ideal for me, I should be aiming in positions like art director or director. On the other hand I enjoy animating and I believe that I should know all the ups and downs of animating a puppet before I could direct an animation.
- that there is an animation project in Poland... something I should look into later on.
- It does not matter what media you use, the employers look if you can animate

It was a nice presentation. Now I have an idea what a show-real should consist and roughly how the industry works. I also have a confirmation that Manchester is a place to go if you're doing stop frame. I have just decided that I will always live in a city with name I can spell without a bigger problem... and Manchester fits in well enough.

Sunday 21 March 2010

Editing in Premiere

At first Premiere was a great pain in the arse, but it turns out that its not so bad after all. I had all sorts of problems with it, starting with imported pictures duration and size, problems with encoding or program lagging, but now when I need to do some operations like adding motion to still images or to resize or apply changes to a bunch of pictures, Premiere is helping me. After some time working with it it turns out that its very instinctive.

Anyhow, I was trying to make the building pan shot using a still image of the building joined from a few pictures. I did not know if Premiere can do motion twining, but I was hoping that it can. And I was right. Here it is. Its still needs some work, and I need to include other shots in between, but I'm happy that it works.

Down the hill

Turns out that the two most difficult shots in the animation are the first two that I'm recording. The pan shot up the building and the walking cycle of the robot, when he is entering the studio. Well to be fair it wasn't simple and all jolly to do. But after a whole weekend of building the miniature of the room, playing with the lights and working out how to animate the robot, I have managed to get what I wanted... or maybe can't be bothered to do it again... anyhow I recorded it few times. First time I didn't even manage to open the door, second my girlfriend run into my room knocking of the lights and the camera from its position, but well... still love her. The next attempt did not go well cause of the robot armature. Although I like the way the robot looks, its feet are to small, so he is out of balance... Well I knew that while building the puppet, but I was not thinking that this is going to such a big problem. To deal with this I had a bar installed above the set, so that the robot was hanging on a wire at all time. I could do that as the shot is out of focus, so you could not see the wire. Last attempt is with a distorted light from the Laptop, but luckily the space with blue laptop light is just out of the shot... So boys and girls remember to wear a black top when you are animating, and double check if anything around you is reflecting light.

Wednesday 17 March 2010

Robot pan shoot attempt


It took about 10 hours of setting up and playing with lights to do this. It took so long as there is simply no space in my room.
Setting up the building was not tough at all. The problem was to set up the miniature that we see in the window. The miniature's floor, doors and walls are in perspective. That means that nothing is square, everything is set in some strange angle... and the funny part is that the room is all turn 90degrees to the right. I couldn't make this shot vertically; I needed to set the building horizontally on its side. By this I was able to move the stenography and not the camera. This way I did not have to worry about setting up lights for the whole building, I had to set the lights only for the place which camera was pointing at. So this method had its ups and downs. The good part is that I have it all recorded.
After watching this video for the first time I thought I will have to retake the whole thing again cause of the reflections in the window, the way that the miniature stenography is appearing in the window, and finally cause of the quality of the animation. It is jumping too much; I thought I need more pictures. Luckily on my Critic at university somebody told me that I could make one picture and digitally animate it in Premiere or After Effects. That is in fact an excellent idea. I'll use the pictures I already made and stick them into one picture. This way I'll have a fluent animation and I will avoid setting up again the whole set to use the green screen. Because when I use still image I'll just remove the content of the window and paste in a new content by using After Effects. The new content will be recorded separately, and that gives me a full control of the lights and good access to the puppet that will be animated.

Robots hand

I did a hand of the robot as I decided that some bits of the animation will be made in live size.
The hand will be used to open the door, lift stuff, hold a cigarette. To animate hand doing those things I need it to have two fingers, pointing and the fuck U one. I build those two fingers with screw joints. The other fingers are made with one wire each with additional wire twisted on the bone bits of the finger so that they would not bend. I build the whole thing on a chicken wire net, as its quick and fun to role it into a tube, and its easy to add metal wire to it.
The hand is designed this way as it needs to correspond with the hand of the robot model.

I'm quite happy with what I end up with.

Armature

Joints made with self locking nuts work very well. In that case I can imagine how well the ball joints could work. The only problem with the screws is that you need to have enough space on the robot to actually use this method. Besides that, there are a few things to remember. First of all, it is import_ant to design the armature so that you could always access the screws. They tend to loosen up now and then. The joints will not work if the wire is too soft as it will bend instead of the joint. The solution is to twist the wire together. The wire that we get in result is surprisingly strong. Easy way of twisting the wire would be with a drill, but a pencil or a screw driver did me fine.
But I think I know what I'll get for my birthday...
I have noticed that for building an armature you need at least two sets of pliers and a vise would be very useful. Most of the time I work with pliers in both hands, and still my fingers are filled with small holes from bending the chicken wire.


Robot armature building stages.


Design of the robot.
It is a human looking robot. I did not wanted to get a box looking chunky creature. It's looking much more like Terminator build with junk... and without all the muscles.
Ball joints are far far too expensive, so I used screws and self locking nuts instead. I saw this method on http://www.stopmotionworks.com/articles/poormansjointarmtures.htm
I have designed the armature thinking about my script_, so that the puppet could do all the required movements, and no more than that... cause more joints means more work for me and uncalled bending when not needed.

Thursday 4 March 2010

Building scenes for Robot.


Building the Pan up scene.

This scene is a shoot of a front of a building. The camera moves from the entrance door to the stairwell up to the Robots room.

At first I wonted the build the set on a A1 peace of paper, but as I was working with the developing of this peace, I started to extend the space to get better quality. I ended up building the set that is bigger than me and that is more than 6.5 feet.

Firs I did a drawing of where the windows and the doors will be. I needed to establish the composition that I would be happy with. I double checked the composition with viewing by the camera. after that I started to put the first coat of paint. I have used Acrylic paint as I have a lot of it and they dry quickly. I needed much more realistic lucking paint If I would use gauche it could end up looking flat. I applied he second coat with a bit darker tone. I used a peace of wood and a big brush. When the paint was still wet I started to hit it with a plastic thin bag...(somerfild brand). Thanks to that I received a nice irregular texture. On the end I added a bit of darker and brighter paints, only in some random places to make it all look a bit more random.

Now I'm on the stage of building the windows. Two of them will be in perspective. That means that realistic they are twice wide as the other windows, but they look the same on the shoot as they are faced to the camera. Al dough some part of the window will be out of focus I still try to make them look nice and detailed. I use plastic for the glass. I did the window sills yesterday, all I need to do now is to make the doors and put it all on the canvas (the whole set is build on a canvas...actually what I used is a blinds that I have found in a bin, and I stretched it on few paces of wood that I have taken from a building site). I wont the door to close at the beginning of the film, but the door are flat. So what I thinking about not using any shading on the door. I will put a see through layer of tape on a glass, when shoot taken, it will look like the tape on the glass is actually the shading on the door. this way i can manipulate with the door, and get a movement of the shade.

And that bring e to the next problem. I wont to have smoke coming out from that door, one way is using green screen, the other is to use glass.

Wednesday 24 February 2010

Making the Animatex for Robot Animation

I planned to make this animatex with the use of paper drawings. Paper caricatures shifted around drown stenography. but it was much easier to make it with the use of real objects, and if I am using objects why should I not use my own hands as hands of the robot. this way I did this strange animation with is still doing what I need it to do. I can see the overall composition of the video. I know where I need to add another sequence of shoots, and where the film does not make any scene.
I feel that my problem with planning and creating the animatex could be lack of experience with film editing. It is difficult for me to plan shoot after shoot what will be happening in the movie. I am not saying that planning is the best way of doing it, but hey... I need to start somewhere.
I hope that I will not make the same mistake that I have made with my previous movie where I did not focused on direction of the movie. I was so absorb with photography of the movie that I the movie it self did not have any sense. With this project on the stage of starting the shooting I would like to have the time to get back to the script writing, just to be double shoot that I know what is the movie about.

Monday 22 February 2010

Robot Animatex

The second I finished this Animatex I was not happy with it. I fell that I would have to spend much more time on it to make it work. Al dough I tried to make it nice and pretty it is still difficult to understand. But it did help me quite a lot.
For the next step after this I decided to make documents with a list of shots in with i will detail what is going on in the shoot. that could help with the comunication with my sound producers. And I will have a nice list where I will make notes about how to build the scenography and how to set the lights.

Robot Animation

The Robot animation is my Personal Project for the university. I have two semester to finalise the project, and right now I have 3 months left.
Together with two sound producers we are making a project about an artist (robot) that is sacrificing him self for the sake of art.
The script is mine, Ill do the animatex, animation, all the design, photography and models... that means that most of the blame is on me, the guys are responsible for the sound. So if it turns out to be shocking... its most likely be my fault... and I need to finish the animation in April so that they could do the music for the ready peace.

This is the concept sketch for the robot.

Blog Starts

I need this blog to document my own work. It could be also a reference for my future employers.
I will try to focus on Stop frame animation, but there will always be something private, something about painting and film.